Project Staff Timesheet (STS)
Topics on this post:
Overview
The Project Staff Timesheet is a document used to record the amount of time that project staff members spend on specific tasks or activities within a project.
The purpose of a project staff timesheet is to track work progress, ensure accurate billing or payroll, manage project costs, and monitor resource allocation and productivity.
Workflow
The The Project Staff Timesheet Workflow is described in the below diagram.
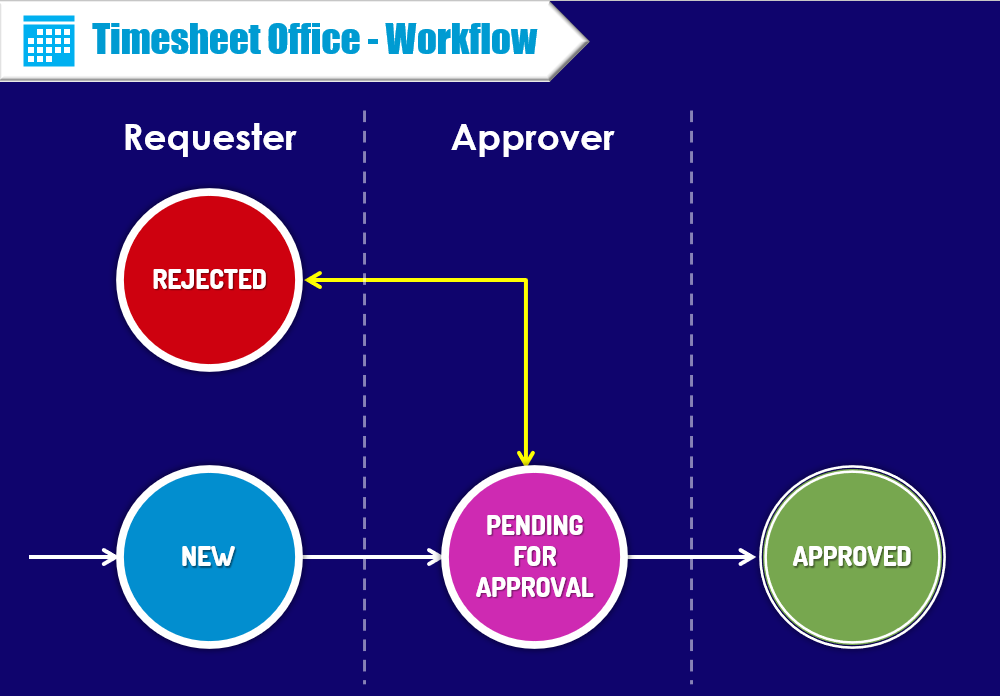
Firstly, the Requester will create a new weekly timesheet document. Now, the document status will be shown New. The Requester is allowed to edit anything at the New status. Then, they will record the working hours for the specific projects. After that, they change the document status from “New” to “Pending for Approval”.
Secondly, the Approver will review the timesheet. If the timesheet is correct and proper, the approver will change the document status to the Approved status. Otherwise, the Approver will reject the document to the Requester with the rejected comment.
Regarding the Rejected status, the Requester will amend the issue and submit it to the Approver again. The authority of the user in the Rejected status will be similar to the New status.
That process will be looped until the timesheet is acceptable and changed to the Approved status.
No one can edit the fields of the document as soon as it is approved.
Navigation
To get the Project Staff Timesheet after login, please click on this link.
View All Page
The View All page will show the documents in the calendar and tree explorer mode which depends on your level in the company.
- If you are a team member, you can just only see your own timesheet.
- If you are a team leader or a manager, you can see the timesheet of your team members and your own timesheet.
- If you are delegated (e.g. HR Manager, a proxy register/approver), you can see either your normal viewport or your delegated viewport.
- In case, you are a senior manager or higher level with a multi-level team structure, please click on the checkbox “Show all staff” to see all your team members.
The View All page is divided into three main areas: a multi-level team structure on the left side, a toolbar on the top of the right side and an annual calendar on the bottom of the right side.
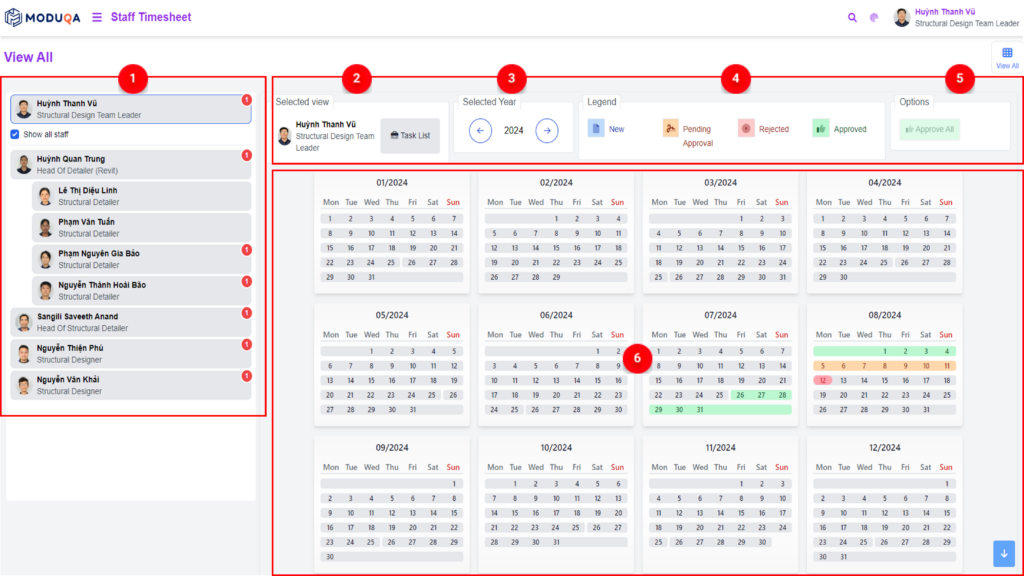
![]() Multi-level team tree explorer – list all team members in your team. If you are an approver, you can click on a specific member to review their timesheet. The number in the red circle at the top of the corner of each member is the number of documents which is pending to be approved by the approver.
Multi-level team tree explorer – list all team members in your team. If you are an approver, you can click on a specific member to review their timesheet. The number in the red circle at the top of the corner of each member is the number of documents which is pending to be approved by the approver.
![]() Selected Staff: let us know that the view page belongs to whom. Moreover, you can see their task list here by clicking on the “Task list” button.
Selected Staff: let us know that the view page belongs to whom. Moreover, you can see their task list here by clicking on the “Task list” button.
![]() Selected Year – show the current yearly calendar. You can change the year by clicking on the transition button (arrow symbols).
Selected Year – show the current yearly calendar. You can change the year by clicking on the transition button (arrow symbols).
![]() Legend – show all the timesheet document statuses. Each colour represents a different state.
Legend – show all the timesheet document statuses. Each colour represents a different state.
![]() Option – the function helps the manager approve multiple timesheet documents of each staff at the time. It only affects the documents with the status “Pending for Approval”.
Option – the function helps the manager approve multiple timesheet documents of each staff at the time. It only affects the documents with the status “Pending for Approval”.
![]() Annual Calendar View – show the staff’s weekly timesheet of the selected whole year. The timesheet document colour also corresponds with the colour of the document status. It is convenient for staff and manager to check whether their monthly timesheet is recorded completely or not.
Annual Calendar View – show the staff’s weekly timesheet of the selected whole year. The timesheet document colour also corresponds with the colour of the document status. It is convenient for staff and manager to check whether their monthly timesheet is recorded completely or not.
- The day shown with a black circle is the current day.
- The day shown with a yellow circle is the leave day.
- The day shown with a red circle is the public holiday day.
Create New
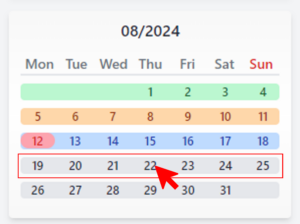
To create a new timesheet for a week, please click on any day of this week. Then, the system will open an editable interface to record the user’s timesheet. When you click back to the View All page, the week you have already created will be coloured with a light blue as New status.
The editing interface will show like the below image. It includes five main parts: the document toolbar, the factor filters, the document header, the task sheet calendar, and the transition button.
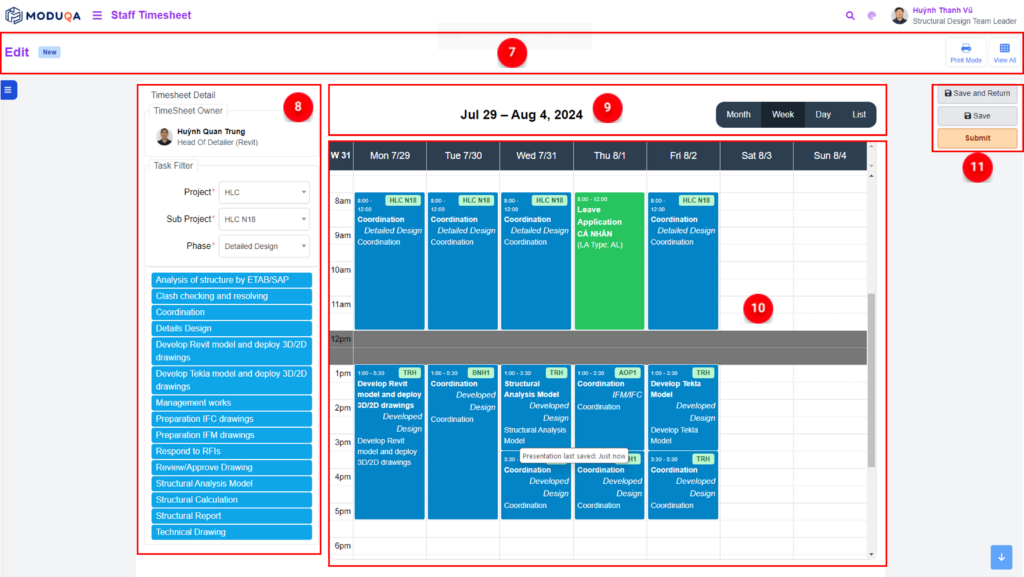
![]() Document Toolbar: show the current document status and other extensions like print mode (print the document) and the button turn back to the View All interface.
Document Toolbar: show the current document status and other extensions like print mode (print the document) and the button turn back to the View All interface.
![]() Factor Filter: this is the part where users can select a Project, Subproject, Project Phase, Task and Subtask on which they have spent time.
Factor Filter: this is the part where users can select a Project, Subproject, Project Phase, Task and Subtask on which they have spent time.
![]() Document Header: show the timesheet period – the selected week in which users are recording the timesheet. Besides that, it also has multiple view modes such as Month, Week, Day, and List.
Document Header: show the timesheet period – the selected week in which users are recording the timesheet. Besides that, it also has multiple view modes such as Month, Week, Day, and List.
![]() Task Sheet Calendar: show the number of working hours that the staff have spent on tasks/subtasks for each project. The personal leave requests and the public holidays belonging to the selected week are also linked from the HR Diginet software.
Task Sheet Calendar: show the number of working hours that the staff have spent on tasks/subtasks for each project. The personal leave requests and the public holidays belonging to the selected week are also linked from the HR Diginet software.
![]() Transition Button: give the options that users can save/submit the timesheet document.
Transition Button: give the options that users can save/submit the timesheet document.
![]() The manipulations are useful for users to record their timesheet document:
The manipulations are useful for users to record their timesheet document:
![]() To record a task in a sheet calendar, users must select the project/subproject/phase first. Then, the tasks/subtasks will show correspondingly with the selected above filters. Users should hover the mouse over the subtask and pull it into the sheet calendar. After that, you can move the task and adjust the time you have spent on it.
To record a task in a sheet calendar, users must select the project/subproject/phase first. Then, the tasks/subtasks will show correspondingly with the selected above filters. Users should hover the mouse over the subtask and pull it into the sheet calendar. After that, you can move the task and adjust the time you have spent on it.
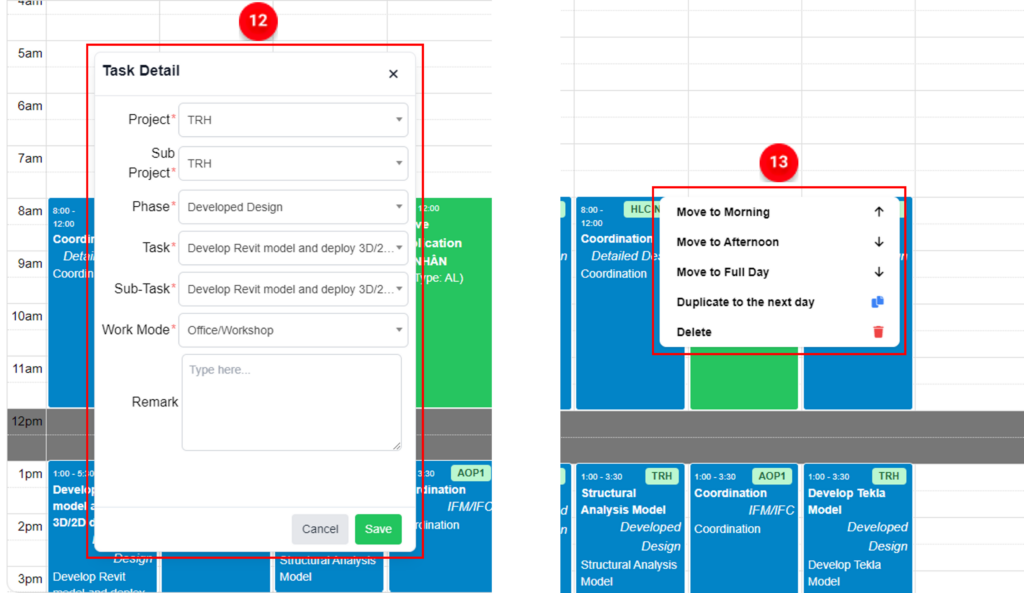
![]() To edit the selected task in the sheet calendar, please left-click the mouse and change the task. You can input a remark here to give more information about the activities you have spent on. Do NOT forget to click on the Save button to save the data you have adjusted.
To edit the selected task in the sheet calendar, please left-click the mouse and change the task. You can input a remark here to give more information about the activities you have spent on. Do NOT forget to click on the Save button to save the data you have adjusted. ![]()
![]() To duplicate/move/delete the selected task in the sheet calendar, please right-click the mouse and choose the one in your demand.
To duplicate/move/delete the selected task in the sheet calendar, please right-click the mouse and choose the one in your demand. ![]()
TLC Project Timesheet Policy
![]() Overhead Cost: If your task is allocated to the overhead, please choose:
Overhead Cost: If your task is allocated to the overhead, please choose:
HOF/HOF (Project/Subproject) for whose workplace is HO and business travel to NZ Site.
TF1 (Project/Subproject) for whose workplace is TF1.
TF2 (Project/Subproject) for whose workplace is TF2.
TF3 (Project/Subproject) for whose workplace is TF3.
NZO (Project/Subproject) for whose workplace is New Zealand Office/Site.
![]() Timesheet submission schedule is finalized as below:
Timesheet submission schedule is finalized as below:
-
For timesheet submission: no later than 23:59:59 on each Saturday.
-
For timesheet approval: no later than 23:59:59 of the following Saturday.
(The below policies are not applied to NZ Teams who have the employee code TLCNZ)
![]() Unnamed Projects: We have set up Unnamed Projects to serve teams working on unnamed projects. Sub-projects are pre-created with names such as Project A01, A02, etc. If you need to use any of these Unnamed Projects, you must provide the subproject’s description to the Software Team (Thuc) to update its title before the booking. This ensures that team members who need to log their hours can do so accurately under the correct sub-project.
Unnamed Projects: We have set up Unnamed Projects to serve teams working on unnamed projects. Sub-projects are pre-created with names such as Project A01, A02, etc. If you need to use any of these Unnamed Projects, you must provide the subproject’s description to the Software Team (Thuc) to update its title before the booking. This ensures that team members who need to log their hours can do so accurately under the correct sub-project.
![]() Task Management Works: This is only applicable to department heads for group management tasks. There will be no “Mail” and “Meeting” tasks within this category.
Task Management Works: This is only applicable to department heads for group management tasks. There will be no “Mail” and “Meeting” tasks within this category.
![]() Mail and Meeting Tasks: These two tasks should be logged based on the content of the work. For example, an email or meeting about the Corridor drawings should be logged under the “Corridor” task. This is because project costs for mail and meetings are essentially part of handling the Corridor work; clients do not pay for our meetings or emails but for our work on the Corridor.
Mail and Meeting Tasks: These two tasks should be logged based on the content of the work. For example, an email or meeting about the Corridor drawings should be logged under the “Corridor” task. This is because project costs for mail and meetings are essentially part of handling the Corridor work; clients do not pay for our meetings or emails but for our work on the Corridor.
![]() 30-Minute Block Entry: A work block is 30 minutes long. Users should book the task they spent the most time on within that 30-minute block. For example, if you spent 5 minutes on Task A, 10 minutes on Task B, and 15 minutes on Task C, you should book the entire 30-minute block under Task C.
30-Minute Block Entry: A work block is 30 minutes long. Users should book the task they spent the most time on within that 30-minute block. For example, if you spent 5 minutes on Task A, 10 minutes on Task B, and 15 minutes on Task C, you should book the entire 30-minute block under Task C.